Friday, June 6, 2008

Canon 30D

The 30D features a 8MP sensor with a Digic II processor.  It does not have many advantages of the 20D if you own one besides a bigger LCD, picture styles, and some other various odds and ends.

The 30D is definitely built like a camera should be.  It is very solid and features a magnesium body.  The rubberized grip is very nice and one can easily fit their hand around it.  Many consider this an upgrade from an XTi, but personally, I would not go from an XTi to a 30D.  If I were to make an upgrade from an XTi, I would go to a 40D.  The 30D's features are nice, but really the only things you get with the 30D that you don't get with the XTi is spot metering and a better build quality.  However, the XTi also has some things that the 30D doesn't have such as: 10 megapixel sensor and a self cleaning unit.  However, it might be better to start out with a 30D over an XTi.   Overall, the 30D has all of the features you would want from a camera of this type. 

Hope this helps!

Canon Rebel XSi

The Canon XSi has many upgrades from the XTi.  For starters it has a: Digic III Processor, Live View, 3.5 frames per second, 3" LCD, 12 megapixels, bigger viewfinder, better grip, upgraded kit lens, and spot metering.

All of these things mentioned above are very nice.  They provide an entry level camera with advanced features.  The only negative I can think of for this camera is that it uses SD cards instead of CF cards so if you have a collection of CF cards, you are going to have to sell them and buy SD cards.  The bigger viewfinder was a big relief, because on previous Rebel cameras, the viewfinder was very small.  The new grip is also a very nice upgrade rubberized  as it uses a ruberized grip.  Also new to a Rebel series camera, it features a dedicated ISO button for easy access and also displays the ISO setting in the viewfinder.  Also this camera has a live view mode.  Although almost every point and shoot has a live view mode, DSLR's are just starting to get them.  Live view is being able to see the shot in a live time on the LCD screen.  It can be very helpful for shots with angles that you simply just can't look through the viewfinder.  Another improvement that is liked by all is the addition of an upgraded kit lens.  The kit lens that came with the XT and XTi, the 18-55 f/3.5-5.6 was a terrible lens and was not very useful.  The new kit lens is the 18-55 f/3.5-5.6 IS.  It provides image stabilization and better optics.  The larger LCD is also a very nice upgrade.  Spot metering is a feature that has never been in a Rebel series camera before and is greatly welcomed in this camera.  Although the price is on the upper side of entry level cameras, you get more than just an entry level camera, you get a camera with advanced features.

Hope that helps!


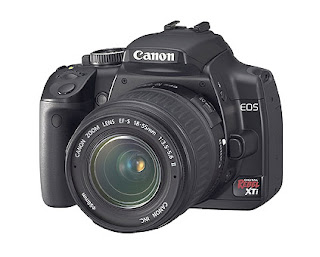
Canon Rebel XTi

The Rebel XTi is a 10 megapixel camera that features a Digic II processor, self cleaning unit, 2.5" LCD screen, and a new 9 point focusing system.

Overall, the Rebel XTi is a very nice upgrade over XT, but not a humongous upgrade.  Some of the improvements are as shown above.  The camera still feels a little small, but the grip has been improved and if you add the battery grip, it feels like a new camera.  The self cleaning unit shakes the low pass filter in front of the sensor to rid it of dust.  This self cleaning unit has been questioned by many but the bottom line is that it is better to have than not have.  The 2.5" LCD is very nice and has all of the camera settings displayed on it since there is no top LCD.  The 10 megapixels is also another nice upgrade.  This camera is relatively cheap and is a great buy.

Hope this helps!

Canon Rebel XT


The Canon Rebel XT is an 8 megapixel camera that features a Digic II Processor.  Now for the review:


To me this camera feels very much like a toy, because of its grip.  This is by far the worst grip out of any Rebel Series camera.  However, if you do not like the small grip, you can buy a battery grip for it that increases the size of the grip and adds another shutter release for vertical shooting for around $150. Also on the back of the camera, there is only a 1.8" screen that is almost useless.  The only thing you can really accomplish on this screen is to check your histogram.  However, looks and LCD screen aside, the camera is capable of getting great images.  8 megapixels might not be up to date with newer bodies, but if you are someone who likes to print relatively small, 8 megapixels is more than enough.  ISO control on this camera is decent.  If properly exposed, I can not see why you would not want to jump to 800 or even 1600.  Unfortunately, like every other Rebel camera, there is no studio sync port for studio lighting.  However, to most people this is not a problem at all.

Overall, since this camera is the cheapest Canon DSLR on the market right now, it can provide great image quality, but if you are looking for something a little bit more robust or have more features, this is not your camera.

Hope this helps!

Thursday, June 5, 2008

Linking Shutter Speed, Aperture, and ISO Together

Putting The Bits and Pieces Together

Now that you know what Aperture, Shutter Speed, and ISO are, now its time to put it together.

One of these things is constantly forcing the other one to change.  Since aperture controls how much light is going in and the shutter speed controls how long you expose the image for and the ISO controls the light sensitivity of the sensor, you have to put it all together!  

The lens for this purpose is a constant f/4 lens...Lets say you have your ISO set to 400, Shutter Speed to 1/200, and Aperture to f/4.  If the image appears dark when you take the picture and review it on the LCD screen, there are a couple of things you can do...one thing is increase your ISO to 800 or lower your shutter speed..It is preferable to lower your shutter speed until it is at a point you can no longer hand hold it, because the higher the ISO the more grain there is in the image...So now if the image still appears dark and you know you can't hand hold the camera steady if you decrease the shutter speed anymore, you should increase the ISO to 800 

This lens for this purpose is a constant f/2.8 lens...You are taking a picture of waterfall, but want the cotton candy look (blurred water).  First thing you should do is put your camera on a tripod, because you just can not hand hold this upcoming shot.  Next you should set your camera to f/2.8, ISO 400, 1/10th SS. Now take the picture and examine it.  if the image is coming out way too bright, increase the f-number to around f/8...Keep experimenting with the f-number and if you just can't find an f-stop that makes the shot not look too bright, decrease the ISO to 100 and take a shot, if it looks too bright, you have to increase the f-number.  Now if the water just doesn't look blurred enough, you have to lower the SS and then reconfigure the ISO and f-number again


Demystifying ISO

What Is ISO?

ISO is simply how sensitive the sensor is to the light that it records.  1 stop increments of ISO are as followed: 100,200,400,800,1600.  In the film age, you would have to physically switch rolls of film out that have different ISO speeds, but now in the digital age, you can simply select it on your camera.

Shortly I will post something that relates every in basic knowledge together (aperture, shutter speed, and ISO)

Demystifying Shutter Speed

What is Shutter Speed?

Shutter Speed (SS) is the time it takes for the mirror to go up and down.  While the mirror flips up, the sensor (the object that records the image) is exposed.  When the mirror flips back down, the sensor stops recording the image.  The longer the shutter speed, the more light that hits the sensor.  Have you ever seen a picture that has a river or waterfall that the water looks this and wonder how its done?

Well it is done by having a slow shutter speed.  Due to a slow shutter speed, the sensor records the water flowing and the final result is like the picture above.  If you take a picture of a flowing river like this with a fast shutter speed, it will look dull and uninteresting.  For sports, you generally use a fast shutter speed so there is no blur in your picture.

The general rule of thumb for taking pictures that have no blur in them is that you double the focal length you are using and use the reciprocal of that that.   For instance, if you are at 200mm, your shutter speed should be 1/400.  However, if you have image stabilization in your lens, you can use a slower shutter speed and still get a shot with no blur.

I will explain more about how/why to use a slow shutter speed in a post that will be coming soon that links everything together.

Hope that helps!